Are you planning a football tournament, a business conference, a rock concert or any type of event with attendees?
Then read on, because this could save you a lot of money.
The success of any event depends on making your target audience aware of your event’s existence. To spread the word around, you probably would run an ad campaign or start a marketing blitz. But wait, do you know that you can also gain the attention of over 500 million globally situated potential attendees by using Facebook Events, a highly effective, innovative and free marketing tool.
Facebook Events is an event promoting application that you can use to create and publish an event page on Facebook. This application also has an invitation feature that lets you remind Facebook account holders about your event and invite individuals who do not have an account with Facebook to register for your event.
The Facebook event application provides you with the following advantages:
| |
Promote your event to a globally situated audience for zero cost.. |
| |
Gain the attention of over 500 million users (average age 25) by publishing your event on facebook. |
| |
Remind individuals about your event by sending reminder mails in form of invitations. |
Now here is the icing on the cake. Not only is this free, but it is also very simple to set up. Here’s how you create an event and direct the attention of Facebook’s 500 million users towards your event:
Step 1: Locating Facebook Event Application

There are 3 ways to locate the Facebook Event application:
| |
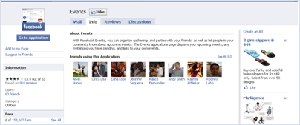
The first, log in to your Facebook account and click on “My Events" from the navigation menu to open up the Events application. |
| |
Second, click on the ‘Event‘ icon located on the bottom of the page. |
| |
Third, if all else fails use a search engine to locate the Facebook Event application. |
Step 2: Creating an Event
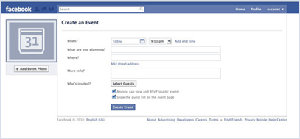
To create an event, click on the "+Create an Event" button. This will open up the ‘Create an Event’ page. On this page, you need to fill in details about your event such as the event name, date, time, venue, description etc. You can also add a poster of the event, by clicking on the Add Photo button in the left panel.
Tips:
Keep everything in place before you get started i.e. develop your event title, description etc.; this will speed up the event page creation process.
Once you have entered your event information, you need to choose who can view your event information i.e. the level of access to your event. The Facebook Event application provides you with two levels of access – Public Events and Private Events. A Public Event is displayed on friends' Feed and anyone using Facebook can view the event info and even add themselves to the guest list even without receiving an invitation. A Private Event is by invitation only. Only people invited to the event will be able to view the event description, wall, or photos i.e. information for a Private Event will not appear on searches and on friend’ feeds.
Tips: If you are creating a Public Event, do not put your home address as the location as anyone can see the details, including location of the event.
Once you have selected your event level, click on the ‘Create Event’ button to continue to the next stage of the event creation process.
Step 3: Upload Photo & Videos, Post Links

In the next stage, you can enhance your event page by adding event photos or videos. You can also provide potential attendees with more information by adding links to your event website or enable them to register instantly by including a ‘register now’ link..
To add photos & videos or post a link, click on the respective icon (photo, video or post) below the text field.
If you click on the photo icon, 3 options will be displayed - add photo from album, upload photo from disk and take photo using webcam option. If you click on ‘add photo from album’, all existing albums on your Facebook account will display. If you click on ‘upload photo from disk’, a browser will open and you can search and upload any photos located on your PC. Lastly, if you click on ‘take photo using webcam’ option, you will be able to click photos using your webcam and post them online.

If you click on the video icon, 2 options will be displayed – record video with webcam and upload video from disk. If you click on ‘record video’, you can use your webcam to record videos and post them on your event page. If you click on ‘upload video from disk’, a browser will open and you can search and upload videos located on your PC.
You can provide potential attendees with more information about your event by entering your event website url in the field provided. You also have the option of posting a registration link on your event page, which will enable interested persons to register and pay for your event instantly.
Step 4: Invite Guests
The last step is to invite guests to your event. You can invite guests to your event by clicking on the "Invite People to Come" button beneath the event photo and selecting guests from your friends list or you can type the name of the person you wish to invite using the "Guest List" tab on the Edit Event page.
Once you have compiled your guest list, click the "Send Invitation Emails" button; enter your event information - event name, date, time, venue, description etc. and complete the process.
Note: If you have friends that do not have a Facebook account, you can invite them by entering their email addresses into the box on the "Guest List" tab of the Edit Event page. On receiving an invitation, they will be able to view the event information and RSVP.
To summarize, Facebook Events is a great and cost effective way to promote your event to a large audience. So, what are you waiting for? Get your event the attention it deserves by creating an event page on Facebook now!